Developer Guide
- Acknowledgements
- Setting up, getting started
- Design
- Implementation
- Documentation, logging, testing, configuration, dev-ops
- Appendix: Requirements
- Appendix: Instructions for manual testing
Acknowledgements
- TAddressBook is a student project based on AddressBook Level 3.
Setting up, getting started
Refer to the guide Setting up and getting started.
Design
.puml files used to create diagrams in this document can be found in the diagrams folder. Refer to the PlantUML Tutorial at se-edu/guides to learn how to create and edit diagrams.
Architecture
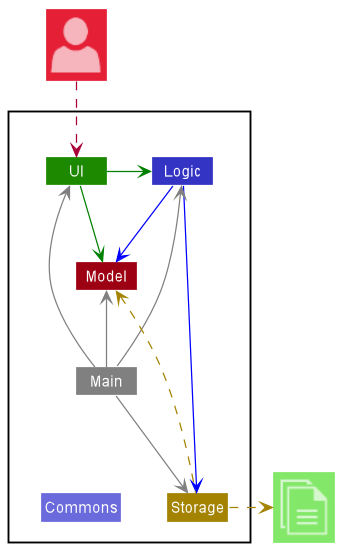
The Architecture Diagram given above explains the high-level design of the App.
Given below is a quick overview of main components and how they interact with each other.
Main components of the architecture
Main has two classes called Main and MainApp. It is responsible for,
- At app launch: Initializes the components in the correct sequence, and connects them up with each other.
- At shut down: Shuts down the components and invokes cleanup methods where necessary.
Commons represents a collection of classes used by multiple other components.
The rest of the App consists of four components.
-
UI: The UI of the App. -
Logic: The command executor. -
Model: Holds the data of the App in memory. -
Storage: Reads data from, and writes data to, the hard disk.
How the architecture components interact with each other
The Sequence Diagram below shows how the components interact with each other for the scenario where the user issues the command delete 1.
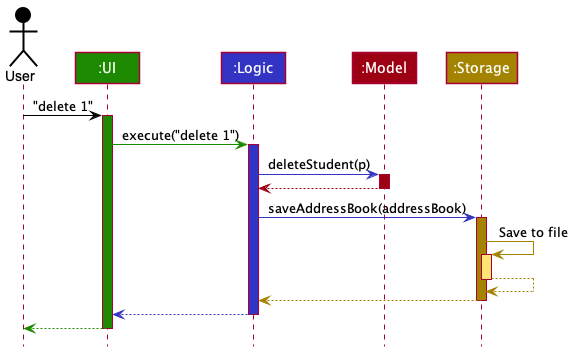
Each of the four main components (also shown in the diagram above),
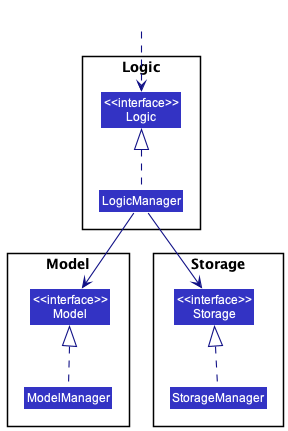
- defines its API in an
interfacewith the same name as the Component. - implements its functionality using a concrete
{Component Name}Managerclass (which follows the corresponding APIinterfacementioned in the previous point).
For example, the Logic component defines its API in the Logic.java interface and implements its functionality using the LogicManager.java class which follows the Logic interface. Other components interact with a given component through its interface rather than the concrete class (reason: to prevent outside components being coupled to the implementation of a component), as illustrated in the (partial) class diagram below.
The sections below give more details of each component.
UI component
The API of this component is specified in Ui.java
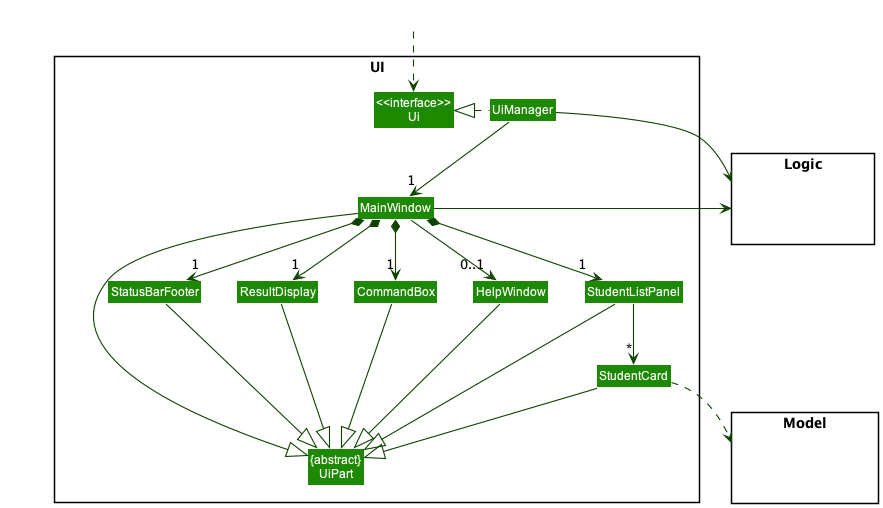
The UI consists of a MainWindow that is made up of parts e.g.CommandBox, ResultDisplay, StudentListPanel, StatusBarFooter etc. All these, including the MainWindow, inherit from the abstract UiPart class which captures the commonalities between classes that represent parts of the visible GUI.
The UI component uses the JavaFx UI framework. The layout of these UI parts are defined in matching .fxml files that are in the src/main/resources/view folder. For example, the layout of the MainWindow is specified in MainWindow.fxml
The UI component,
- executes user commands using the
Logiccomponent. - listens for changes to
Modeldata so that the UI can be updated with the modified data. - keeps a reference to the
Logiccomponent, because theUIrelies on theLogicto execute commands. - depends on some classes in the
Modelcomponent, as it displaysStudentobject residing in theModel.
Logic component
API : Logic.java
Here’s a (partial) class diagram of the Logic component:
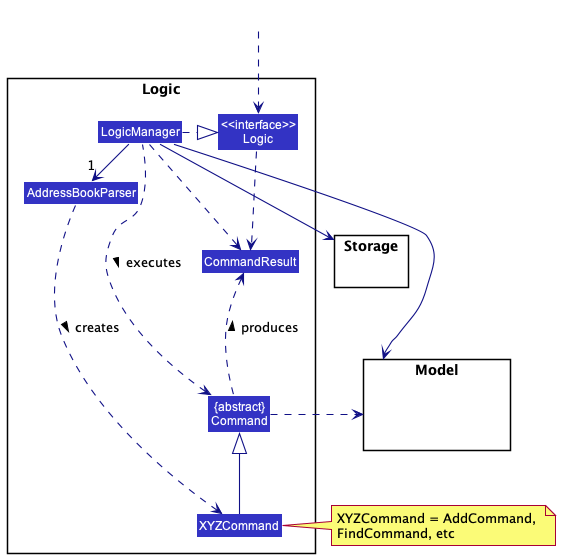
How the Logic component works:
- When
Logicis called upon to execute a command, it uses theAddressBookParserclass to parse the user command. - This results in a
Commandobject (more precisely, an object of one of its subclasses e.g.,AddCommand) which is executed by theLogicManager. - The command can communicate with the
Modelwhen it is executed (e.g. to add a student). - The result of the command execution is encapsulated as a
CommandResultobject which is returned back fromLogic.
Sequence Diagram: delete
The Sequence Diagram below illustrates the interactions within the Logic component for the execute("delete 1") API call.
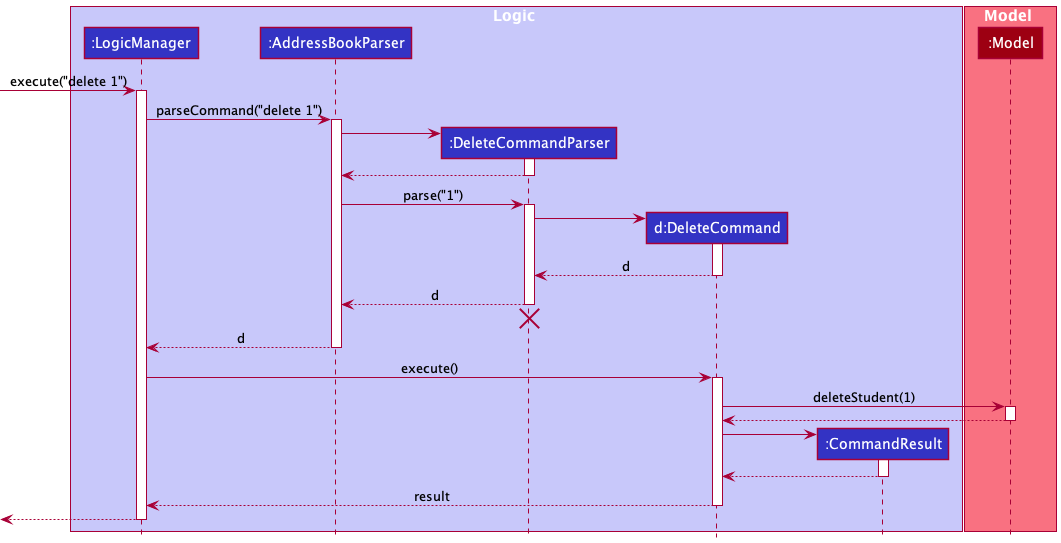
DeleteCommandParser should end at the destroy marker (X) but due to a limitation of PlantUML, the lifeline reaches the end of diagram.
Here are the other classes in Logic (omitted from the class diagram above) that are used for parsing a user command:
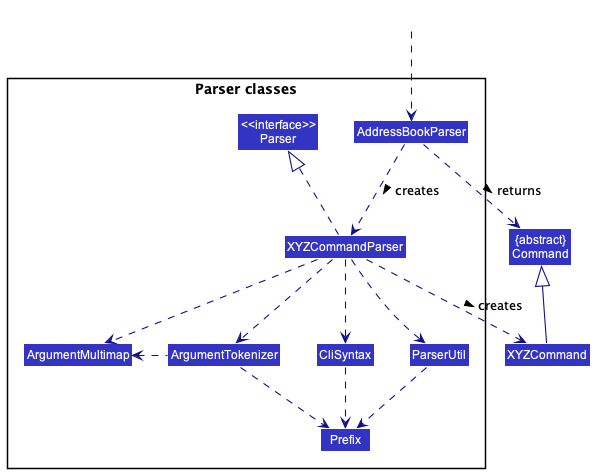
How the parsing works:
- When called upon to parse a user command, the
AddressBookParserclass creates anXYZCommandParser(XYZis a placeholder for the specific command name e.g.,AddCommandParser) which uses the other classes shown above to parse the user command and create anXYZCommandobject (e.g.,AddCommand) which theAddressBookParserreturns back as aCommandobject. - All
XYZCommandParserclasses (e.g.,AddCommandParser,DeleteCommandParser, …) inherit from theParserinterface so that they can be treated similarly where possible e.g, during testing.
Model component
API : Model.java
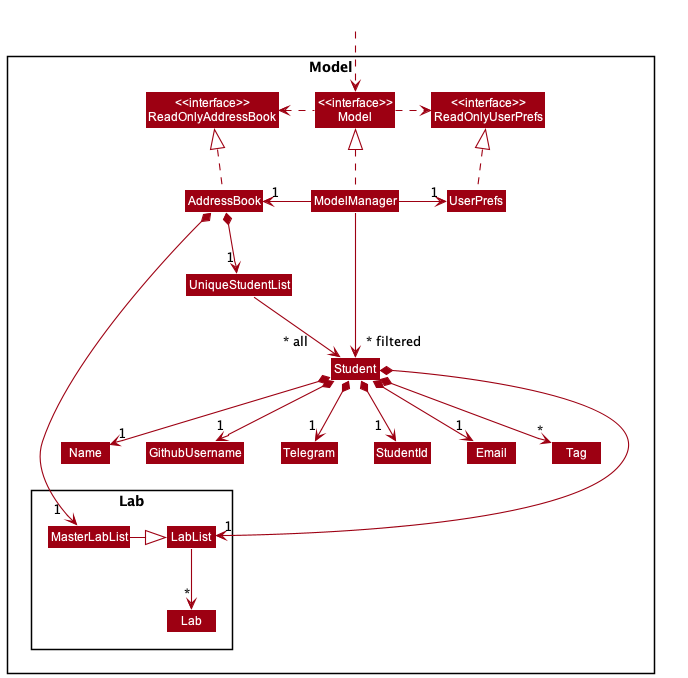
The Model component,
- stores the TAddressBook data i.e., all
Studentobjects (which are contained in aUniqueStudentListobject). - stores the currently ‘selected’
Studentobjects (e.g. results of a search query) as a separate filtered list which is exposed to outsiders as an unmodifiableObservableList<Student>that can be ‘observed’ e.g. the UI can be bound to this list so that the UI automatically updates when the data in the list change. - stores a
UserPrefobject that represents the user’s preferences. This is exposed to the outside as aReadOnlyUserPrefobjects. - does not depend on any of the other three components (as the
Modelrepresents data entities of the domain, they should make sense on their own without depending on other components)
Tag list in the AddressBook, which Student references. This allows AddressBook to only require one Tag object per unique tag, instead of each Student needing their own Tag objects.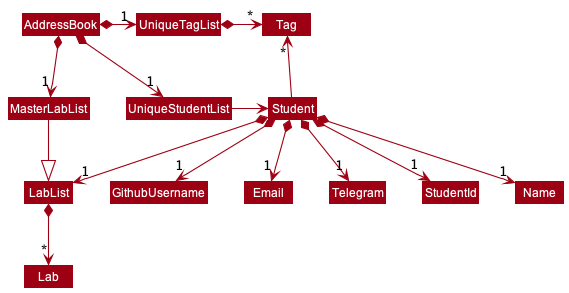
Lab component (Subcomponent of Model)
The Lab Component is a subcomponent of the Model component.
- stores all lab-related data.
- stores all
Labobjects related to aStudentobject in aLabList(eachStudentobject has its own copy of aLabList). - the
MasterLabListstores allLabobjects added into the system thus far to act as a control list (there should only be 1MasterLabListin the system at any given time).
Storage component
API : Storage.java
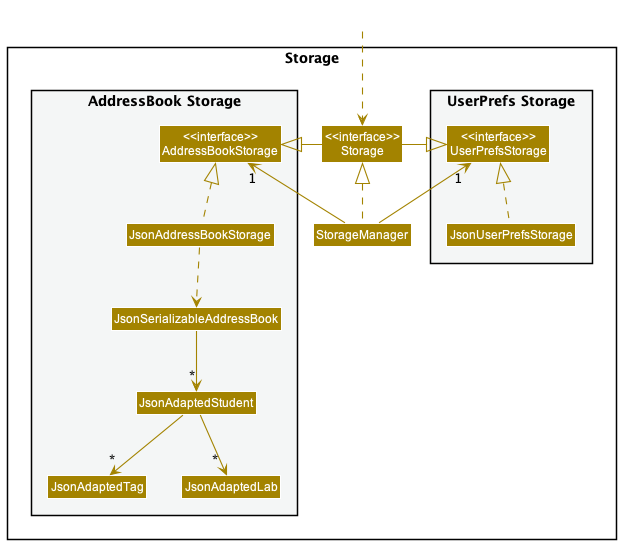
The Storage component,
- can save both TAddressBook data and user preference data in json format, and read them back into corresponding objects.
- inherits from both
AddressBookStorageandUserPrefStorage, which means it can be treated as either one (if only the functionality of only one is needed). - depends on some classes in the
Modelcomponent (because theStoragecomponent’s job is to save/retrieve objects that belong to theModel)
Common classes
Classes used by multiple components are in the seedu.address.commons package.
Implementation
This section describes some noteworthy details on how certain features are implemented.
labadd: Add Lab Command Feature
The labadd feature allows a CS2030S Lab TA to add a new unique Lab into the TAddressBook. The add lab command takes in 1 argument LAB_NUMBER.
The command format for add lab is labadd l/LAB_NUMBER where LAB_NUMBER should be an Integer between 0 and 20 inclusive.
e.g labadd l/1
The add lab command is implemented as follows:
-
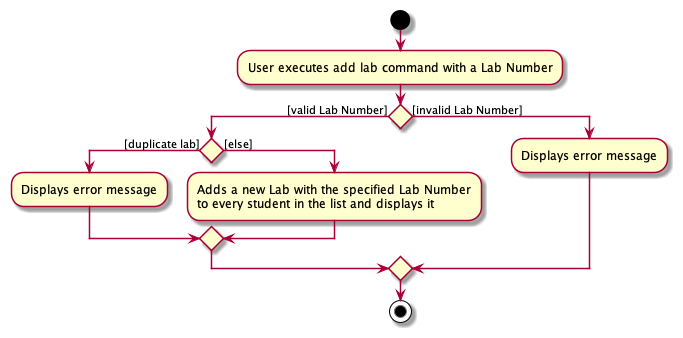
When a
labaddcommand is executed by the user,AddLabCommandParser#parse(String)will be invoked to parse the given command into a newAddLabCommandobject with the givenLAB_NUMBER. If theLAB_NUMBERis invalid, aParseExceptionwill be thrown and displayed to the user. -
AddCommand#execute(Model)will then execute with the currentModelobject in the system. -
The
AddCommandobject will then check if theModelobject already has the lab (in this case having a lab means that theMasterLabListhas aLabobject with the sameLAB_NUMBER), and if theModelalready has theLab, it will throw a newCommandException. -
The
AddCommandobject will then check if theModelobject’sUniqueStudentListis empty, and if it is empty, the system will output a message to the user to notify the user that the student list is empty, however, the lab will still be added into theMasterLabListfor storing. -
The
AddCommandobject will then add the newLabto theMasterLabListand theLabListof every student in theUniqueStudentList.
add(Lab) operation on a LabList (this includes MasterLabList as it extends LabList) will sort the LabList by increasing LAB_NUMBER.
The sequence for parsing the input is similar to the one shown in this sequence diagram above.
The following UML sequence diagram shows the interaction between components during the execution of the labadd command:
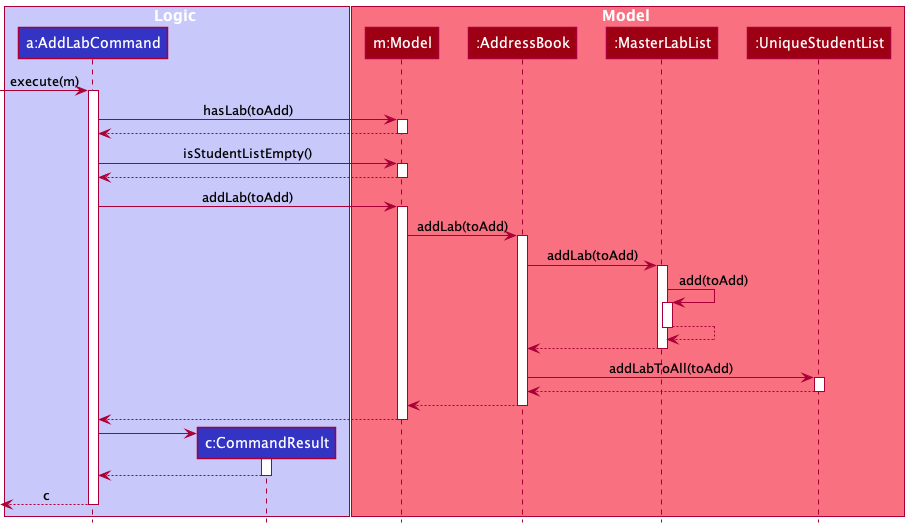
toAdd refers to the Lab object with the given LAB_NUMBER to be added.The method
addLabToAll in UniqueStudentList will call LabList#add(Lab)for all Students in the list. This is left out of the sequence diagram as it is meant to be a higher level diagram.The implementation of
LabList#add(Lab) was left out of the above sequence diagram as the diagram is meant to show the interaction between components at a higher level of abstraction.The sequence diagram for the implementation of
LabList#add(Lab) will be shown separately below.
LabList#add(Lab), I chose to leave the reference frame out as PlantUML’s reference frames are huge and would lead to clutter in the above sequence diagram thereby decreasing readability. Instead, this short note will suffice.
The following UML sequence diagram shows how add(Lab) is implemented in LabList:
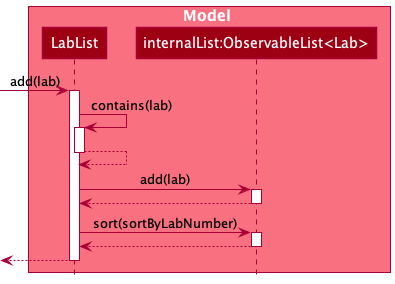
lab refers to the Lab object with the given LAB_NUMBER to be added and sortByLabNumber is a Comparator that sorts the Lab objects by increasing LAB_NUMBER.
The following UML activity diagram shows what happens when a user executes a labadd command:
filter: Filter Students by Labs Feature
The filter feature allows user to filter the list of students by their Lab and its LabStatus.
The Filter feature is implemented by updating fitleredStudents using StudentHasLabPredicate which extends
Predicate<Student>. StudentHasLabPredicate contains the attribute Lab and overrides the Predicate#test() method to
determine if a Student has a specific Lab in its LabList.
The command format for filter is fitler l/LAB_NUMBER s/LAB_STATUS where LAB_NUMBER should a Lab that exists within
TAddressBook and LAB_STATUS should be one of the three values below:
-
u: UNSUBMITTED -
s: SUBMITTED -
g: GRADED
Given below is an example usage scenario and how the filter mechanism behaves at each step.
-
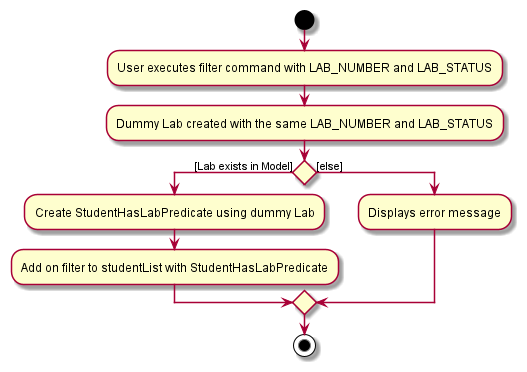
When the user executes
filtercommand,FilterCommandParser#parse(String)will be invoked to parse the given command and create aStudentHasLabPredicatewith a dummyLabwith the givenLabStatus. Then, a newFilterCommandis instantiated using theStudentHasLabPredicate. -
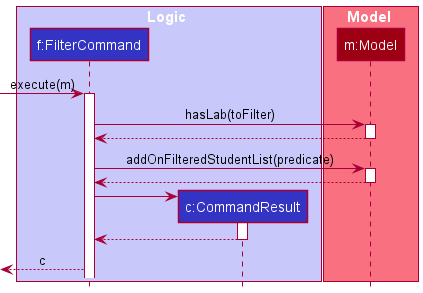
FilterCommand#execute(Model)will then execute the command on the currentModelof the system. -
The
FilterCommandobject will check if theModelobject contains theLabcarried by theStudentHasLabPredicate. If theLabis not found, aCommandExceptionwill be thrown. -
The
StudentHasLabPredicateis passed as a parameter into theModel#addOnFilteredStudentList(Predicate)method. -
Modelobject retrieves its originalPredicate<Student>to performPredicate#and(Predicate)with theStudentHasLabPredicatepassed in. The newPredicate<Student>is used to filter thefilteredStudentswithin theModelobject. -
A
CommandResultobject is created with a feedback message and is returned.
The UML sequence diagram below shows the parsing of the user input using FilterCommandParser to create a
StudentHasLabPredicate and subsequently a FilterCommand object.
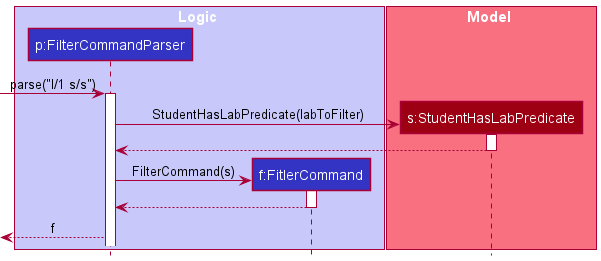
After the FilterCommand object is created, it is utilised to filter the student list.
The following UML sequence diagram shows the interaction between the components during the execution of the filter command:
The following UML activity diagram shows what happens when a filter command is executed:
labedit: Edit Lab Feature
Implementation
The labedit feature allows for editing of the LabStatus and/or LabMark of a specified Lab in the TAddressBook.
The format of this command is labedit INDEX l/LAB_NUMBER (s/LAB_STATUS) (m/LAB_MARK), where:
-
INDEXcorresponds to the index number of a student, according to the currently displayed student list -
LAB_NUMBERcorresponds to an existing lab in the TAddressBook -
LAB_STATUSis eitheru/s/g(UNSUBMITTED/SUBMITTED/GRADED) -
LAB_MARKis an integer from 0 to 100 inclusive - The parentheses indicate that at least one of
s/LAB_STATUSandm/LAB_MARKmust be provided
The implementation of labedit is as follows:
- When
AddressBookParser#parseCommanddetectslabeditas the command word, it creates a newEditLabCommandParserwith the given arguments. -
EditLabCommandParserparses the parameters and throws aParseExceptionif any invalid values are encountered. -
EditLabCommand#execute(Model)will then execute with the currentModelin the system. - The
EditLabCommandobject checks if the givenINDEXis out of bounds. - The
EditLabCommandobject checks if the given combination ofLAB_STATUSandLAB_MARKis valid.
LAB_STATUS and no LAB_MARK
* LAB_MARK and no LAB_STATUS
* LAB_MARK and LAB_STATUS of GRADED
- The
EditLabCommandcallsLabList#setLabof the student specified by the givenINDEX, which edits the targetLabto the newLab.
The following sequence diagram shows the interactions between components during a labedit command, labedit l/1 s/u:
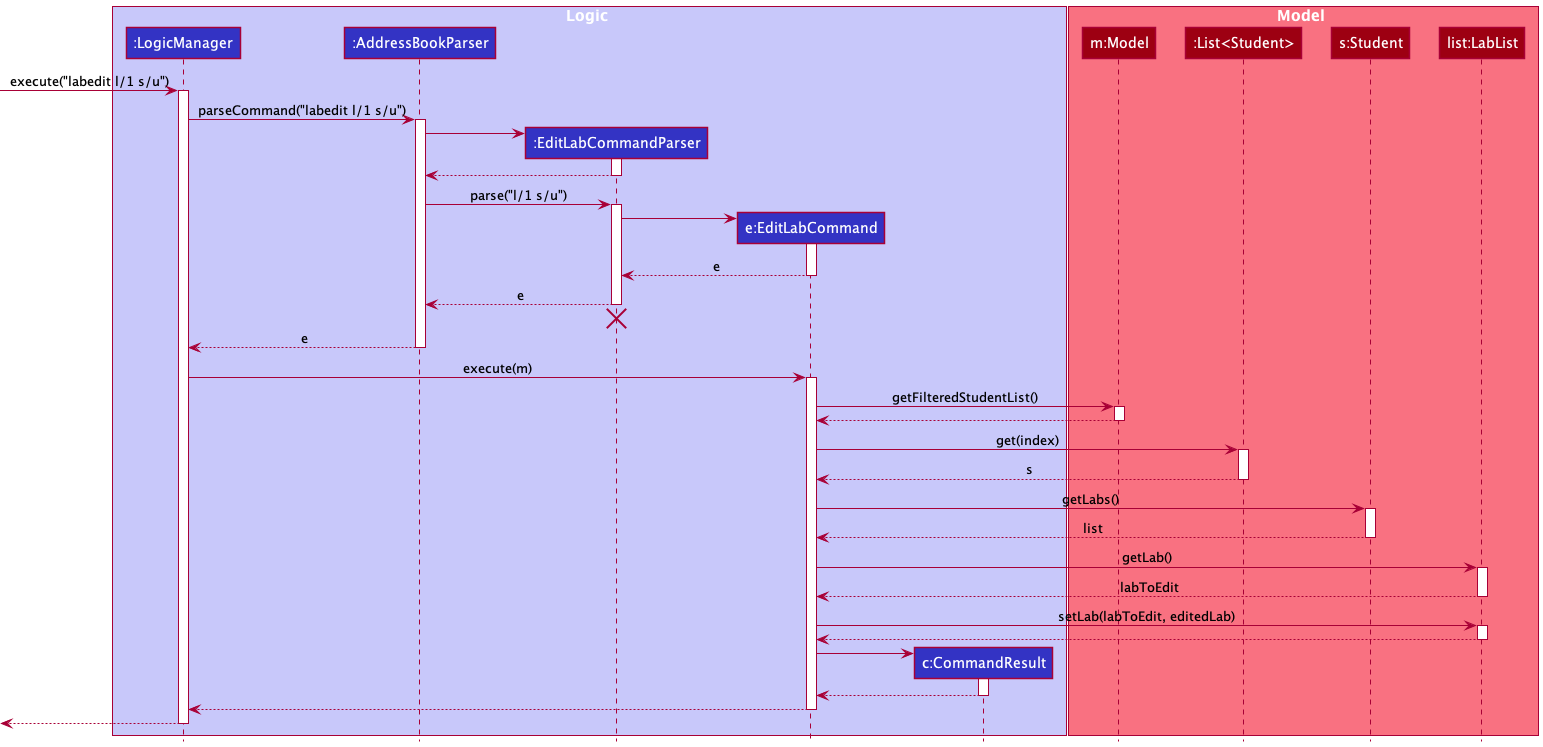
LabList#setLab have been intentionally omitted. They can be found in the sequence diagram below.
The following sequence diagram shows how LabList#setLab is implemented:
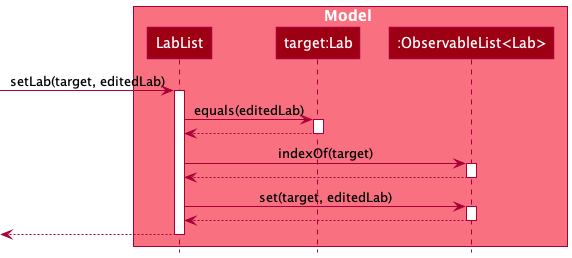
The detailed steps are as follows:
-
LabList#setLabchecks if the editedLabis the same as the originalLab, and whether the targetLabexists in theLabList. -
LabList#setLabedits the targetLabto the newLabwith differentLabStatusand/orLabMark.
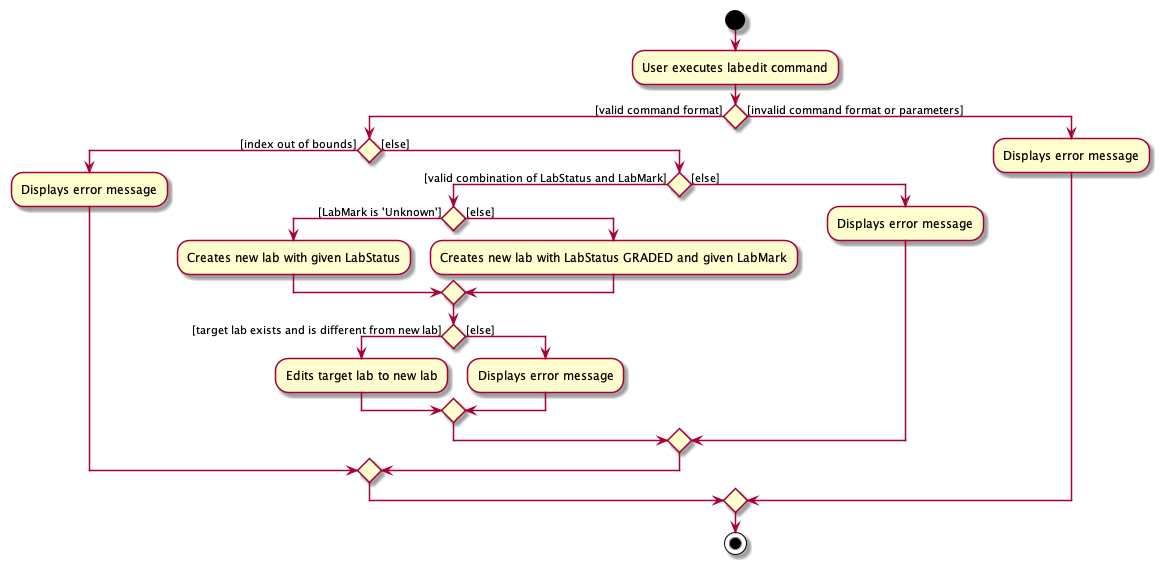
To summarize, the following activity diagram shows what happens when the user requests to edit a lab:
[Proposed] Undo/redo feature
Proposed Implementation
The proposed undo/redo mechanism is facilitated by VersionedAddressBook. It extends AddressBook with an undo/redo history, stored internally as an addressBookStateList and currentStatePointer. Additionally, it implements the following operations:
-
VersionedAddressBook#commit()— Saves the current TAddressBook state in its history. -
VersionedAddressBook#undo()— Restores the previous TAddressBook state from its history. -
VersionedAddressBook#redo()— Restores a previously undone TAddressBook state from its history.
These operations are exposed in the Model interface as Model#commitAddressBook(), Model#undoAddressBook() and Model#redoAddressBook() respectively.
Given below is an example usage scenario and how the undo/redo mechanism behaves at each step.
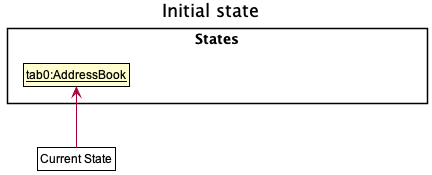
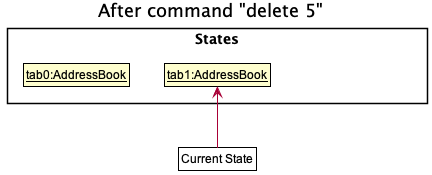
Step 1. The user launches the application for the first time. The VersionedAddressBook will be initialized with the initial TAddressBook state, and the currentStatePointer pointing to that single TAddressBook state.
Step 2. The user executes delete 5 command to delete the 5th student in the TAddressBook. The delete command calls Model#commitAddressBook(), causing the modified state of the TAddressBook after the delete 5 command executes to be saved in the addressBookStateList, and the currentStatePointer is shifted to the newly inserted TAddressBook state.
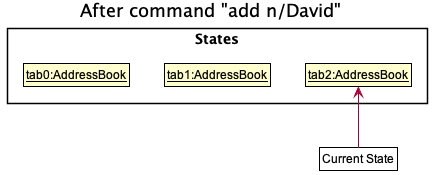
Step 3. The user executes add n/David … to add a new student. The add command also calls Model#commitAddressBook(), causing another modified TAddressBook state to be saved into the addressBookStateList.
Documentation, logging, testing, configuration, dev-ops
Appendix: Requirements
Product scope
Target user profile:
CS2030S Teaching Assistants (TAs) who
- have to keep track of students’ details
- have to keep track of students’ performance and progress on labs
- have to keep track of their own progress on grading labs
- prefer desktop apps over other types
- can type fast
- prefer typing to mouse interactions
- are reasonably comfortable using CLI apps
Value proposition: provides CS2030S TAs with a systematic way to keep track of students and their lab assignments, including who he/she has graded and what grade was given for every lab.
User stories
Priorities: High (must have) - * * *, Medium (nice to have) - * *, Low (unlikely to have) - *
| Priority | As a … | I want to … | So that I can… |
|---|---|---|---|
* * * |
TA | add a student to my class list | begin keeping track of their lab assignments |
* * * |
TA | edit a student’s information | fix any errors I made during the initial adding phase or add information that was not provided to me before |
* * * |
TA | delete a student from my class list | my list will be reflective of who is currently in my class |
* * * |
TA | list all students | have an overview of all the students in my class |
* * * |
TA | locate students by name | easily find students whose names contain certain keywords |
* * * |
TA | filter students based on the status of their labs | quickly filter out the students that possess the same tags |
* * * |
TA | add a new lab assignment to the assignment list | keep track of which lab assignments have been released to students |
* * * |
TA | update status of a lab when a student has submitted it | keep track of which labs students have submitted |
* * * |
TA | update status of a lab and add marks to it when I have graded it | keep track of what labs I have graded and how I have graded them |
* * * |
TA | edit status and marks of a lab | edit lab statuses and marks I changed or entered by mistake |
* * * |
TA | remove a lab assignment from the TAddressBook | delete any labs that I’ve previously inputted by accident |
* * |
TA | add students without filling in all attributes | keep track of students even if I do not know all their details |
Use cases
(For all use cases below, the System is the TAddressBook (TAB) and the Actor is the CS2030S Teaching Assistant (TA), unless otherwise specified)
Use case UC1: Add a new lab to the list of labs
MSS
- TA requests to add new lab with a given lab number.
- TAB adds a new lab to every student.
- TAB shows updated student list with the new lab added.
-
TAB displays success message.
Use case ends.
Extensions
- 1a. TAB detects that the student list is empty.
-
1a1. TAB displays warning message to user (that there are no students yet but students added subsequently will have the new lab).
Use case ends.
-
- 1b. TAB detects that an identical lab already exists.
-
1b1. TAB displays error message (that lab already exists).
Use case ends.
-
- 1c. TAB detects that the lab number provided is not an integer between 0 and 20 inclusive.
-
1c1. TAB displays error message (that the lab number is invalid).
Use case ends.
-
Use case UC2: Filter students by status of a specified lab
MSS
- TA requests to filter students by a specific lab and lab status.
-
TAB displays list of students based on filter criteria.
Use case ends.
Extensions
- 1a. TA provides non-existent lab.
-
1a1. TAB shows error message (that the lab does not exist).
Use case ends.
-
- 1b. TA tries to filter an empty list.
-
1b1. TAB shows error message.
Use case ends.
-
Use case UC3: Mark a student’s lab as submitted
MSS
- TA requests to change a student’s lab status to “Submitted”.
- TAB changes the student’s lab status from “Unsubmitted” to “Submitted”.
-
TAB displays updated lab status and success message.
Use case ends.
Extensions
- 1a. TA provides invalid student index.
-
1a1. TAB shows error message that student index is invalid.
Use case ends.
-
- 1b. TA provides non-existent lab.
-
1b1. TAB shows error message stating that the lab number is invalid.
Use case ends.
-
- 1c. TA provides lab that is already “SUBMITTED” or “GRADED”.
-
1c1. TAB shows error message stating that the command cannot be used due to the current lab status.
Use case ends.
-
Use case UC4: Mark a student’s lab as graded
MSS
- TA requests to change a student’s lab status to “Graded” and specifies a mark.
- TAB changes the student’s lab status from either “Unsubmitted” or “Submitted” to “Graded”.
- TAB adds the specified mark to the student’s lab.
-
TAB displays updated lab status and success message.
Use case ends.
Extensions
- 1a. TA provides invalid student index.
-
1a1. TAB shows error message that student index is invalid.
Use case ends.
-
- 1b. TA provides non-existent lab.
-
1b1. TAB shows error message stating that the lab number is invalid.
Use case ends.
-
- 1c. TA provides lab that is already “Graded”.
-
1c1. TAB shows error message stating that the command cannot be used due to the current lab status.
Use case ends.
-
- 1d. TA provides an invalid mark (e.g. a negative number).
-
1d1. TAB shows error message stating that valid range of the mark.
Use case ends.
-
Use case UC5: Edit a student’s lab
MSS
- TA requests to edit a specified student lab’s status and/or mark.
- TAB edits the specified student lab’s status and/or mark.
-
TAB displays updated lab status (if lab status was edited) and success message.
Use case ends.
Extensions
- 1a. TA provides invalid student index.
-
1a1. TAB shows error message that student index is invalid.
Use case ends.
-
- 1b. TA provides non-existent lab.
-
1b1. TAB shows error message stating that the lab number is invalid.
Use case ends.
-
- 1c. TA provides invalid status and grade combination e.g. providing a grade when the updated status is “UNSUBMITTED”.
-
1c1. TAB shows error message stating that the given combination is invalid.
Use case ends.
-
- 1d. TA provides an invalid grade (e.g. a negative number).
-
1d1. TAB shows error message stating that valid range of the mark.
Use case ends.
-
Use case UC6: Remove a lab from the list of labs
MSS
- TA requests to remove a lab with a given lab number.
- TAB removes the lab from every student.
- TAB shows updated list of labs.
-
TAB displays success message.
Use case ends.
Extensions
- 1a. TAB detects that the lab number provided is not an integer between 0 and 20 inclusive.
-
1a1. TAB displays error message (that lab number is invalid).
Use case ends.
-
- 1b. TAB detects that the lab number provided is not a lab present in the TAddressBook.
-
1b1. TAB displays error message (that lab number does not exist).
Use case ends.
-
Non-Functional Requirements
- Should work on any mainstream OS as long as it has Java
11or above installed. - Should be able to hold up to 1000 students without a noticeable sluggishness in performance for typical usage.
- A TA with above average typing speed for regular English text (i.e. not code, not system admin commands) should be able to accomplish most of the tasks faster using commands than using the mouse.
- Should be intuitive for both new users and experienced users.
Glossary
- Mainstream OS: Windows, Linux, Unix, OS-X
- Lab: Refers to lab assignments from the module CS2030S offered by the National University of Singapore.
-
Lab Status: Refers to possible statuses of lab assignments.
- UNSUBMITTED: Status to indicate that the student has not submitted the lab assignment.
- SUBMITTED: Status to indicate that the student has submitted the lab assignment to his/her GitHub repository.
- GRADED: Status to indicate that the User (TA) has graded the lab assignment.
Appendix: Instructions for manual testing
Given below are instructions to test the app manually.
Launch and shutdown
-
Initial launch
-
Download the jar file and copy into an empty folder
-
Double-click the jar file Expected: Shows the GUI with a set of sample contacts. The window size may not be optimum.
-
-
Saving window preferences
-
Resize the window to an optimum size. Move the window to a different location. Close the window.
-
Re-launch the app by double-clicking the jar file.
Expected: The most recent window size and location is retained.
-
-
{ more test cases … }
Deleting a Student
-
Deleting a student while all students are being shown
-
Prerequisites: List all students using the
listcommand. Multiple students in the list. -
Test case:
delete 1
Expected: First contact is deleted from the list. Details of the deleted contact shown in the status message. Timestamp in the status bar is updated. -
Test case:
delete 0
Expected: No students is deleted. Error details shown in the status message. Status bar remains the same. -
Other incorrect delete commands to try:
delete,delete x,...(where x is larger than the list size)
Expected: Similar to previous.
-
Adding a Lab
- Assuming the
LabListis empty and the list has someStudents.-
Test case:
labadd l/1
Expected:Lab 1will appear as a red label on eachStudent’s card in the list. -
Test case:
labadd l/21
Expected: A error message will appear with the correct command format and constraints and no lab will be added. -
Test case:
labadd l/-1
Expected: A error message will appear with the correct command format and constraints and no lab will be added.
-
Editing a Lab
- Assume we want to edit
Lab 1of the person withINDEX 1and the currentLabStatusisUNSUBMITTED.-
Test case:
labedit 1 l/1 s/s
Expected: The status ofLab 1will change fromUNSUBMITTEDtoSUBMITTED. The lab label will change from red to yellow. -
Test case:
labedit 1 l/1 s/g
Expected: An error message will appear stating that the given combination is invalid. -
Test case:
labedit 1 l/1 s/g m/10
Expected: The status ofLab 1will change fromUNSUBMITTEDtoGRADED. The lab label will change from red to green.
-